| « xul:filefield | カスタムツリービューの基本的な使い方(その10~階層構造 – フォルダ開閉) » |
カスタムツリービューの基本的な使い方(その9~階層構造 – 表示)


これまで(その1~その8)は階層構造が無いフラットなツリーを取り扱ってきたが、その9ではいよいよ階層構造を有するツリーの表示を行う。
階層構造を有するツリーは、データの構造次第で実装方式も大きく変わってくるため、データの構造について熟考する必要がある。
今回のサンプルで用いるデータ構造はあくまでも一例に過ぎない。
ベースとなるソースコードはその1~表示を参照。
3種類のアイテム形式
今回ツリー上に表示するすべてのアイテムは、通常のアイテム、フォルダ、セパレータのうちのいずれかの形式となる。
これらを定数として定義しておく。これらの値は、後述の FruitItem オブジェクトの type プロパティとして使用する。
const TYPE_LEAF = 1;
const TYPE_FOLDER = 2;
const TYPE_SEPARATOR = 3;
FruitItem クラス
データに格納する個々のアイテムを表すクラスとして、下表のようなプロパティを有する FruitItem クラスを定義する。
id, type, name, parent, open プロパティはコンストラクタの引数からセットされ、 empty, level, hasNext, parentIndex プロパティは後述する FruitsTreeView#_buildVisibleData の処理内で計算してセットされる。
open, empty の2つのプロパティはフォルダ(つまり type が 2)の場合のみ使用する。
| プロパティ | 型 | 概要 |
|---|---|---|
| id | string | 個々の FruitItem オブジェクトを一意に識別するためのID。 |
| type | number | 前述の3つのタイプのうちのいずれか。 |
| name | string | ツリー上で表示する文字列。 |
| parent | string | 親フォルダのID。 |
| open | boolean | nsITreeView#isContainerOpen 用。フォルダの開閉状態を表す。 |
| empty | boolean | nsITreeView#isContainerEmpty 用。フォルダが空かどうかを表す。 |
| level | number | nsITreeView#getLevel 用。ツリー上での深さ(インデントレベル)。 |
| hasNext | boolean | nsITreeView#hasNextSibling 用。フォルダ内の最下部かどうかを表す。 |
| parentIndex | number | nsITreeView#getParentIndex 用。親フォルダのツリー上での行番号。 |
/**
 * FruitItem ctor
 */
function FruitItem(aID, aType, aName, aParent, aOpen) {
    this.id     = aID;
    this.type   = aType;
    this.name   = aName;
    this.parent = aParent;
    this.open   = aOpen;
    // following four properties will be set later
    // in the process of FruitsTreeView#_buildVisibleData
    this.empty       = null;
    this.level       = null;
    this.hasNext     = null;
    this.parentIndex = null;
}
データ
今回用いる元データは、 FruitItem オブジェクトの配列である。この配列内でのアイテムの順序はツリー上で表示されるべき順序と必ずしも一致する必要は無い。しかし、親フォルダ(parent プロパティ)が同一のアイテムの順序は実際のツリー上での表示に一致している必要がある。
つまり、今回のデータでは “root” フォルダを親とするアイテムが4つ存在するが、これらは配列内の位置が若い順番でツリー表示されることになる。
    // array of FruitItem objects
    var data = [
        new FruitItem("item#A", TYPE_FOLDER   , "Red"       , "root"  , true),
        new FruitItem("item#B", TYPE_LEAF     , "Apple"     , "item#A", null),
        new FruitItem("item#C", TYPE_LEAF     , "Cherry"    , "item#A", null),
        new FruitItem("item#D", TYPE_SEPARATOR, ""          , "item#A", null),
        new FruitItem("item#E", TYPE_LEAF     , "Peach"     , "item#A", null),
        new FruitItem("item#F", TYPE_FOLDER   , "Yellow"    , "root"  , false),
        new FruitItem("item#G", TYPE_FOLDER   , "Citrus"    , "item#F", false),
        new FruitItem("item#H", TYPE_LEAF     , "Lemon"     , "item#G", null),
        new FruitItem("item#I", TYPE_LEAF     , "Grapefruit", "item#G", null),
        new FruitItem("item#J", TYPE_LEAF     , "Banana"    , "item#F", null),
        new FruitItem("item#K", TYPE_SEPARATOR, ""          , "root"  , null),
        new FruitItem("item#L", TYPE_FOLDER   , "Blue"      , "root"  , false),
    ];
上記の元データを引数として new FruitsTreeView(data) した時点で、 gFruitsTreeView._data は下表に示すような FruitItem オブジェクトの配列となる。
| id | type | name | parent | open | empty | level | hasNext | parentIndex | |
|---|---|---|---|---|---|---|---|---|---|
| [0] | item#A | 2 | Red | root | true | ||||
| [1] | item#B | 1 | Apple | item#A | |||||
| [2] | item#C | 1 | Cherry | item#A | |||||
| [3] | item#D | 3 | item#A | ||||||
| [4] | item#E | 1 | Peach | item#A | |||||
| [5] | item#F | 2 | Yellow | root | false | ||||
| [6] | item#G | 2 | Citrus | item#F | false | ||||
| [7] | item#H | 1 | Lemon | item#G | |||||
| [8] | item#I | 1 | Grapefruit | item#G | |||||
| [9] | item#J | 1 | Banana | item#F | |||||
| [10] | item#K | 3 | root | ||||||
| [11] | item#L | 2 | Blue | root | false |
ツリー表示用データ _visibleData
階層構造の無いツリーでは、並び替えを行う場合を除けば、 _data として内部的に保持する配列データがすなわちツリーに表示させるデータであった。
今回の階層構造を有するツリーの場合、すべてのフォルダが開いている状態という前提であれば、 _data の配列のインデックス=ツリー上での行番号という等式が成り立つため、 _data をそのままツリー表示用データとして使用することが可能となる。
しかし、階層構造を有するツリーの場合、フォルダの開閉に伴い一部のデータがツリー上で表示されない状態も考慮しなければならない。
そこで、元データ _data とは別に、実際にツリー上で表示するアイテムだけの配列 _visibleData も内部的に保持することにする。
フォルダの開閉状態が変化するたびに _data から _visibleData を構築して、ツリー表示用データとして使用するのである。
このように _visibleData を生成する処理を FruitsTreeView クラスの _buildVisibleData メソッドとして実装する。
また、 _buildVisibleData から呼び出される副次的なメンバとして以下のプロパティやメソッドを実装する。
| メンバ名 | 概要 |
|---|---|
| _getChildItems | 引数 aParent で指定したidのフォルダを親とする FruitItem オブジェクトの配列を返す。 |
| _processChildItems | FruitItem オブジェクトの配列の個々の要素に対して level, hasNext, parentIndex, open, empty の各プロパティを計算して付与しながら _visibleData を構築する。サブフォルダが存在する場合、サブフォルダ内の孫アイテムに対して再帰的に処理する。 |
| _currentLevel | _processChildItems で現在処理中のアイテムのレベルを保持する。 |
| _parentIndex | _processChildItems で現在処理中のアイテムの親フォルダの行番号を保持する。 |
_buildVisibleData メソッドでは、 _data 内の全オブジェクトのうち、 parent が “root” のオブジェクトを _getChildItems を使って取得し、それらについて _processChildItems で処理する。
    ////////////////////////////////////////////////////////////////
    // visible data builder

    _visibleData: [],

    _currentLevel: 0,

    _parentIndex: -1,

    _buildVisibleData: function() {
        this._visibleData = [];
        this._currentLevel = 0;
        this._parentIndex = -1;
        // process for each child of the root folder
        var childItems = this._getChildItems("root");
        this._processChildItems(childItems);
    },

    _getChildItems: function(aParent) {
        return this._data.filter(function(elt) {
            return (elt.parent == aParent);
        });
    },

    _processChildItems: function(aChildItems) {
        // process for each child
        for (var i = 0; i < aChildItems.length; i++) {
            var child = aChildItems[i];
            // compute and set |level|, |hasNext| and |parentIndex| properties
            child.level = this._currentLevel;
            child.hasNext = i < aChildItems.length - 1;
            child.parentIndex = this._parentIndex;
            var grandChildItems = null;
            // if child is a folder, compute and set |empty| properties
            if (child.type == TYPE_FOLDER) {
                grandChildItems = this._getChildItems(child.id);
                child.empty = grandChildItems.length == 0;
            }
            this._visibleData.push(child);
            // if child is an open folder, process grandchildren recursive
            if (child.type == TYPE_FOLDER && child.open) {
                var parentIndexBak = this._parentIndex;
                this._parentIndex = this._visibleData.length - 1;
                this._currentLevel++;
                this._processChildItems(grandChildItems);
                this._currentLevel--;
                this._parentIndex = parentIndexBak;
            }
        }
    },
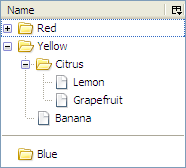
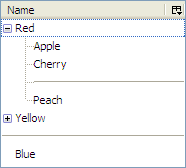
_buildVisibleData メソッドを使って初回の _visibleData 構築を行うと、下表に示すような FruitItem オブジェクトの配列が生成される。
ピンク色で着色した部分は、 _buildVisibleData メソッドの処理によって計算され、新たに付与されたプロパティである。
今後ツリーの表示に変化が生じる何かが発生したら(例えばフォルダの開閉)、 _buildVisibleData メソッドを使って各プロパティの再計算と _visibleData の再構築を行うことになる。
| id | type | name | parent | open | empty | level | hasNext | parentIndex | |
|---|---|---|---|---|---|---|---|---|---|
| [0] | item#A | 2 | Red | root | true | false | 0 | true | -1 |
| [1] | item#B | 1 | Apple | item#A | 1 | true | 0 | ||
| [2] | item#C | 1 | Cherry | item#A | 1 | true | 0 | ||
| [3] | item#D | 3 | item#A | 1 | true | 0 | |||
| [4] | item#E | 1 | Peach | item#A | 1 | false | 0 | ||
| [5] | item#F | 2 | Yellow | root | false | false | 0 | true | -1 |
| [6] | item#K | 3 | root | 0 | true | -1 | |||
| [7] | item#L | 2 | Blue | root | false | true | 0 | false | -1 |
nsITreeView インタフェースの実装
次に、 nsITreeView インタフェース各メンバの実装を行う。
rowCount プロパティは当然 _data ではなく _visibleData 配列の長さを返す。
    get rowCount() {
        return this._visibleData.length;
    },
今回初登場のメソッドの概要を下表に示す。
| メソッド名 | 概要 |
|---|---|
| isContainer | 行番号 index の行がフォルダかどうかを返す。 |
| isContainerOpen | 行番号 index の行のフォルダの開閉状態を返す。 ある行について isContainer が true かつ isContainerEmpty が false の時、 (1) isContainerOpen が falseを返せばツリー上の左端に + 記号が表示される (2) isContainerOpen が true を返せばツリー上の左端に - 記号が表示される |
| isContainerEmpty | 行番号 index の行のフォルダ内に中身があるかどうかを返す。 |
| getParentIndex | 行番号 index の行の親となるフォルダの行番号を返す。 親が存在しないレベル0のアイテムについては-1を返すようにする。 このメソッドが正しい値を返さないと、レベル2より深いフォルダの罫線が正しく描画されない。 |
| hasNextSibling | 行番号 index の行がフォルダ内の最下部のアイテムかどうかを返す。 (1) true を返せばツリーの罫線が ├ で表示される (2) falseを返せばツリーの罫線が └ で表示される |
| getLevel | 引数 index の行のインデントレベルを返す。 最上位に位置するアイテムはレベル0、レベル0のフォルダ直下のアイテムはレベル1…となる。 |
| toggleOpenState | 行番号 index の行のフォルダの開閉状態を変更しようとしたときに呼び出される。 具体的にはセルをダブルクリックした時、左端の +/- 記号をクリックした時。 あるいはフォルダを選択して Enter キーや ←/→ キーを押下した時。 |
これら6つのメソッドを含む下記8メソッドは、いずれも _visibleData 内の対応するオブジェクトのプロパティを調べて返すだけで済む。
これらのメソッドはツリー表示時に繰り返し呼び出されるため、このように _buildVisibleData であらかじめ計算しておいてプロパティを返すだけにしておけば、パフォーマンス向上につながる。
    isContainer: function(index) {
        return this._visibleData[index].type == TYPE_FOLDER;
    },
    isContainerOpen: function(index) {
        return this._visibleData[index].open;
    },
    isContainerEmpty: function(index) {
        return this._visibleData[index].empty;
    },
    isSeparator: function(index) {
        return this._visibleData[index].type == TYPE_SEPARATOR;
    },
    getParentIndex: function(rowIndex) {
        return this._visibleData[rowIndex].parentIndex;
    },
    hasNextSibling: function(rowIndex, afterIndex) {
        return this._visibleData[rowIndex].hasNext;
    },
    getLevel: function(index) {
        return this._visibleData[index].level;
    },
    getCellText: function(row, col) {
        switch (col.index) {
            case 0: return this._visibleData[row].name;
        }
    },
setTree はこれまで通りの nsITreeBoxObject を保持する処理に加えて、 _buildVisibleData で初回の _visibleData を生成する。
    setTree: function(tree) {
        this._treeBoxObject = tree;
        this._buildVisibleData();
    },
toggleOpenState の実装は「その10~階層構造 - フォルダ開閉」の記事で別途行う予定である。したがって、現段階ではツリーは表示のみで、フォルダをダブルクリックしても何も起こらない。
    toggleOpenState: function(index) {
        alert("Not implemented yet.");
    },
アイコン表示
以上の階層構造を有するツリー表示では、せいぜいフォルダが+/-記号で表示されるくらいの簡素な見た目だが、実際のブックマークツリーなどではフォルダ型のアイコンなどが表示されている。
このようなアイコン表示を実現するためには、ブックマークツリー用のスタイルシートを読み込ませ、 nsITreeView#getCellProperties メソッドで下記のようにセルのプロパティへ "title" という値を追加する必要がある。これは xul:treecell 要素へ properties="title" 属性を追加することと等価で、 treechildren::-moz-tree-image(title) などの規則で定義されたスタイルがセルに対して適用されるようになる。
const ATOM_SVC = Components.classes["@mozilla.org/atom-service;1"].
                 getService(Components.interfaces.nsIAtomService);
    getCellProperties: function(row, col, properties) {
        if (col.index == 0 && this._visibleData[row].type != TYPE_SEPARATOR)
            properties.AppendElement(ATOM_SVC.getAtom("title"));
    },
関連記事
- カスタムツリービューの基本的な使い方(その1~表示)
- カスタムツリービューの基本的な使い方(その2~追加・削除)
- カスタムツリービューの基本的な使い方(その3~インライン編集)
- カスタムツリービューの基本的な使い方(その4~並び替え)
- カスタムツリービューの基本的な使い方(その5~ドラッグ&ドロップ)
- カスタムツリービューの基本的な使い方(その6~複数列ツリー)
- カスタムツリービューの基本的な使い方(その7~プログレスバー)
- カスタムツリービューの基本的な使い方(その8~チェックボックス)
- カスタムツリービューの基本的な使い方(その9~階層構造 – 表示)
- カスタムツリービューの基本的な使い方(その10~階層構造 – フォルダ開閉)